MDB tracing with the Sielaff Redbox: Unterschied zwischen den Versionen
Apaul (Diskussion | Beiträge) (Die Seite wurde neu angelegt: „==Introduction== The "tracing" is a recording of the MDB communication in the machine, we use the Redbox in the "Black edition" from Sielaff as an aid. Record…“) |
Apaul (Diskussion | Beiträge) |
||
| (6 dazwischenliegende Versionen desselben Benutzers werden nicht angezeigt) | |||
| Zeile 6: | Zeile 6: | ||
==Preparation== | ==Preparation== | ||
Ideally, two Redboxes are required for recording in connection with a | Ideally, two Redboxes are required for recording in connection with a Vencube. One Redbox is connected to the Vencube on the master side and the other on the slave side. To distinguish between the red boxes later, it makes sense to label them, e.g. with master (machine control) and slave (credit systems). | ||
'''Required:''' | '''Required:''' | ||
| Zeile 24: | Zeile 24: | ||
</gallery> | </gallery> | ||
The Redbox has an MDB plug and an MDB socket on the connection cable. It is simply smuggled in between Vencube and the VMC or between Vencube and the payment systems. | |||
:Redbox 1 | :Redbox 1 for the VMC side (master) | ||
:Redbox 2 | :Redbox 2 for the slave area (slave) | ||
{| class="wikitable float-right" width="40%" | {| class="wikitable float-right" width="40%" | ||
|[[Datei:Achtung.png|50px]] | |[[Datei:Achtung.png|50px]] | ||
| style="background-color:#FFD700;" | | | style="background-color:#FFD700;" | | ||
Before connecting the Redboxes, the machine must be switched off! | |||
|} | |} | ||
== | ==Tracing== | ||
=== | ===Service=== | ||
{| class="wikitable" style="text-align:center" width="40%" | {| class="wikitable" style="text-align:center" width="40%" | ||
|- | |- | ||
! colspan="4" | | ! colspan="4" |Function of the Redbox joystick | ||
|- | |- | ||
| width="5%" | | | width="5%" |left | ||
| width="25%" | | | width="25%" |Step back | ||
| width="5%" |{{Pfl}} | | width="5%" |{{Pfl}} | ||
| rowspan="5" width="5%" |[[Datei:Redbox_1.png|thump|150px]] | | rowspan="5" width="5%" |[[Datei:Redbox_1.png|thump|150px]] | ||
|- | |- | ||
| | |high | ||
| | |Menu up | ||
|{{Pfo}} | |{{Pfo}} | ||
|- | |- | ||
| | |down | ||
| | |Menu down | ||
|{{Pfu}} | |{{Pfu}} | ||
|- | |- | ||
| | |right | ||
| | |Enter the selected menu item | ||
|{{Pfr}} | |{{Pfr}} | ||
|- | |- | ||
| | |press | ||
| | |Enter the selected menu item | ||
|'''OK''' | |'''OK''' | ||
|} | |} | ||
===Trace | ===Start Trace=== | ||
{| class="wikitable float-right" width="40%" | {| class="wikitable float-right" width="40%" | ||
|- | |- | ||
! colspan="3" | | ! colspan="3" |Enable redbox for tracing | ||
|- | |- | ||
| width="25%" valign="top" | | | width="25%" valign="top" | | ||
;Redbox | ;Turn on Redbox | ||
:Redbox | :Turn on Redbox by pressing the joystick, the following start screen appears. | ||
: | :Right-clicking the joystick takes you to the main menu. | ||
| style="text-align:center" width="5%" |{{Pfr}} | | style="text-align:center" width="5%" |{{Pfr}} | ||
| style="text-align:center" width="5%" |[[Datei:Redbox_Start_1.png|thump|200px]] | | style="text-align:center" width="5%" |[[Datei:Redbox_Start_1.png|thump|200px]] | ||
|- | |- | ||
| valign="top" | | | valign="top" | | ||
; | ;Main menu | ||
: | :Select Tools here. | ||
| style="text-align:center" |{{Pfu}}<br>{{Pfu}}<br>{{Pfr}} | | style="text-align:center" |{{Pfu}}<br>{{Pfu}}<br>{{Pfr}} | ||
| style="text-align:center" |[[Datei:Redbox_Trace_1.png|thump|200px]] | | style="text-align:center" |[[Datei:Redbox_Trace_1.png|thump|200px]] | ||
| Zeile 86: | Zeile 86: | ||
| valign="top" | | | valign="top" | | ||
;Tools | ;Tools | ||
: | :Under Tools then select MDB Trace. | ||
| style="text-align:center" |{{Pfr}} | | style="text-align:center" |{{Pfr}} | ||
| style="text-align:center" |[[Datei:Redbox_Trace_2.png|thump|200px]] | | style="text-align:center" |[[Datei:Redbox_Trace_2.png|thump|200px]] | ||
| Zeile 92: | Zeile 92: | ||
| valign="top" | | | valign="top" | | ||
;MDB Trace | ;MDB Trace | ||
: | :Now the trace starts. | ||
| style="text-align:center" | | | style="text-align:center" | | ||
| style="text-align:center" |[[Datei:Redbox_Trace_3.png|thump|200px]] | | style="text-align:center" |[[Datei:Redbox_Trace_3.png|thump|200px]] | ||
|- | |- | ||
| valign="top" | | | valign="top" | | ||
; | ;Switch on the machine | ||
: | :Now the MDB communication is recorded. | ||
| style="text-align:center" | | | style="text-align:center" | | ||
| style="text-align:center" |[[Datei:Redbox_Trace_4.png|thump|200px]] | | style="text-align:center" |[[Datei:Redbox_Trace_4.png|thump|200px]] | ||
| Zeile 105: | Zeile 105: | ||
{| class="wikitable float-right" width="40%" | {| class="wikitable float-right" width="40%" | ||
|[[Datei:Hinweis.png|50px]] | |[[Datei:Hinweis.png|50px]] | ||
| style="background-color:#b1cded;" | | | style="background-color:#b1cded;" |The tracing should be started with the machine switched off, because we need to record the switch-on and start-up phase of the MDB communication. | ||
|} | |} | ||
== | ==Reading the red boxes== | ||
# | #Connect the Redbox to the PC with a USB cable. | ||
# | #The Redbox is now displayed in Explorer as a drive like a USB stick. | ||
# | #Now switch to the <code>Trace</code> folder on the Redbox. | ||
# | #Copy all files located here down to your computer. | ||
# | #Please indicate on the files whether it is the master (control) or slave (credit system) trace. | ||
# | #Now these files can be emailed. Please note that many e-mail services have a file volume limit of '''10MB'''. | ||
[[ | [[Category:Index]] | ||
[[ | [[Category:Instructions]] | ||
Aktuelle Version vom 20. Mai 2022, 09:44 Uhr
Introduction
The "tracing" is a recording of the MDB communication in the machine, we use the Redbox in the "Black edition" from Sielaff as an aid. Recordings of the MDB communication can be evaluated by us for error analysis. The recordings are saved on a micro SD card located in the Redbox. The Redbox has a mini-USB connection and can be connected to a PC, where the Redbox behaves like a USB stick.
Preparation
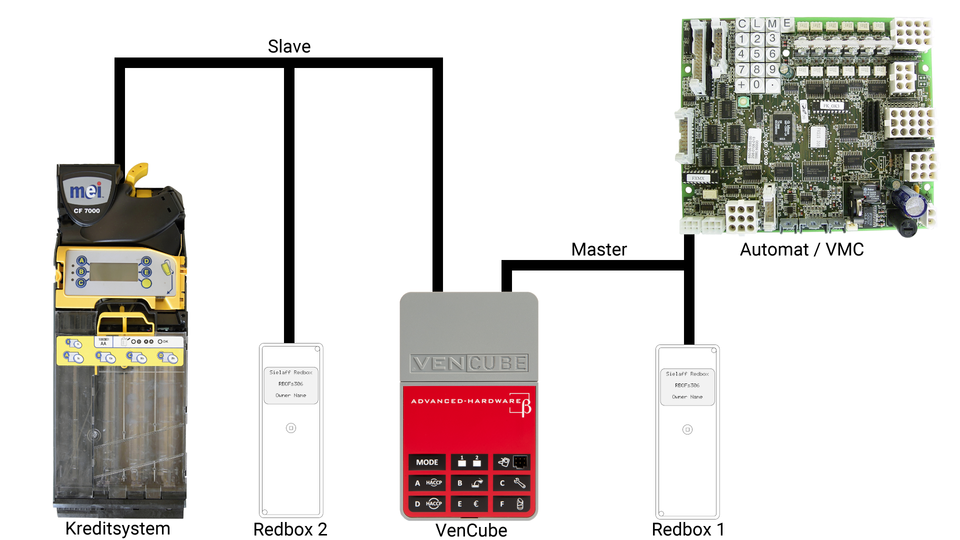
Ideally, two Redboxes are required for recording in connection with a Vencube. One Redbox is connected to the Vencube on the master side and the other on the slave side. To distinguish between the red boxes later, it makes sense to label them, e.g. with master (machine control) and slave (credit systems).
Required:
- 2x red box
- Windows PC with a free USB port
- USB Cable (USB-A ⇔ USB-Mini-B)
Connecting the Redboxes
- Turn off the vending machine.
- Connect the two redboxes as in the picture below.
- The section Tracing continues...
-
Redbox Anschluß

The Redbox has an MDB plug and an MDB socket on the connection cable. It is simply smuggled in between Vencube and the VMC or between Vencube and the payment systems.
- Redbox 1 for the VMC side (master)
- Redbox 2 for the slave area (slave)
|
Before connecting the Redboxes, the machine must be switched off! |
Tracing
Service
| Function of the Redbox joystick | |||
|---|---|---|---|
| left | Step back | 
| |
| high | Menu up | ||
| down | Menu down | ||
| right | Enter the selected menu item | ||
| press | Enter the selected menu item | OK | |
Start Trace
| Enable redbox for tracing | ||
|---|---|---|
|

| |
|

| |
|

| |
|

| |
|

| |

|
The tracing should be started with the machine switched off, because we need to record the switch-on and start-up phase of the MDB communication. |
Reading the red boxes
- Connect the Redbox to the PC with a USB cable.
- The Redbox is now displayed in Explorer as a drive like a USB stick.
- Now switch to the
Tracefolder on the Redbox. - Copy all files located here down to your computer.
- Please indicate on the files whether it is the master (control) or slave (credit system) trace.
- Now these files can be emailed. Please note that many e-mail services have a file volume limit of 10MB.