Operating the Vencube with a Höfer HVMC-100 controller
Requirement
For MDB operation of the Vencube on an HVMC controller, the use of an EPROM with the software version:
HVMC 100-CC Version 1.38EUR (2Mbit)
is absolutely necessary! EPROMs larger than 1Mbit cannot be used in the first series of HVMC controllers, which is why only a BDV Vencube can be used here. All subsequent HVMC controllers are equipped for MDB operation with a Vencube after a software update. These controllers can be distinguished by the label printed on them.
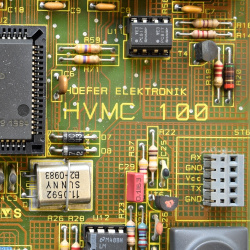
HVMC 100
|
Print: HVMC 100:
Vencube can only be connected under BDV!
|
HVMC 100-1/-2/-3
- The software version
HVMC 100 Version 1.38 EUR must be used.
- Switch the control to MDB operation: ⇒ Set DIP switch 2 to OPEN.
- In the menu, set
C8.A with Display card amount
After a possible EPROM replacement, the control must be initialized and reconfigured; all previous data will be lost.
Connecting the Vencube with MDB interface
Preparation
- Switch off the machine control (press the machine main switch or remove ST7)
- Check the EPROM version:
HVMC 100-CC version 1.00 must be replaced with
HVMC 100-CC version 1.38!
Note the installation direction, the notch of the EPROM and the IC socket is important and not the EPROM sticker.
- Insert the Vencube into the MDB interface of the control.
- Connect MDB payment systems to the Vencube via MDB.
- Switch on the machine.
Initialize control
- The following should now appear on the display:
Eprom exchange -> Initialize!
- Set dip switches 1+5 to the edge of the board and 2-4 to OPEN (control initialization)!
- Press the star button
- The following is shown on the LC display:
Clear ??
- Now press selection button 5 on the machine.
- Now set all dip switches to OPEN again.
- Wait until
Help! F6 appears on the display.
- Either continue with the section "Switching to a two-line display" or continue with the section "Switching to MDB operation".
Switching to a two-line display
| Function of the selection buttons in the service menu
|
| Select 1
|
Back from the submenu
|

|
| Select 2
|
Step forward (up) in the menu
|

|
| Select 3
|
Step back (down) in the menu
|

|
| Select 4
|
Call (enter) the selected menu item
|

|
| Select 5
|
Special functions (delete)
|
Clear
|
- If a two-line display is installed, the display setting must be changed to 2 lines with 16 characters.
Important: With a one-line LC display, this point can be skipped!
- Press the star button for more than 5 seconds:
Clr ERR! appears (keep holding it down)
and wait for the ServMenu display and then release.
The following: C 0. .
- Press selection button 2: You will be asked for a password!
PW ????
Password is 4231, press the relevant selection buttons and after entering it the following appears: C 1. .
- Press selection button 4 and press selection button 2 several times to go to the menu item
C 1.C..
- Use selection button 4 to call up the setting
1Zl.8St.
and use selection button 2 to set it to two lines. 2Zl.16St
- Use the selection key 1 to go back until
C 0. . is shown on the display.
- Press the star button
- Wait until
Help! F6 is shown on the display.
Switch to MDB operation
- Activate MDB credit system: Set dip switch 1, 3-5 to OPEN and dip switch 2 to the edge of the board.
- If required, activate the empty lamp control for GP: Set dip switch 4 to the edge of the board.
- Press the star button
After the control system has booted up, one of the two displays should appear on the display.
either: No change! or: Hello
Set machine
| Function of the selection buttons in the service menu
|
| Select 1
|
Back from the submenu
|
|
| Select 2
|
Step forward (larger) in the menu
|
|
| Select 3
|
Step back (smaller) in the menu
|
|
| Select 4
|
Call (enter) the selected menu item
|
|
| Select 5
|
Special functions (delete)
|
Clear
|
- Press the star button for more than 5 seconds:
Clr ERR! appears (keep holding)
and wait for the ServMenu display and release.
The following : C 0. .
- Press selection key 2: You will be asked for a password!
PW ????
Password is 4231, press the respective selection keys and after entering the following appears: C 1. .
- Now configure the machine in the following menu items:
- #
C1.3 Set the date and time
C1.6 Set the number of slotsC1.1 Assign the selection keys to the outputsC6 Price setting- Important!:
C8 Set credit system setting in menu item C8.A to "show with card amount"!
- Use button 1 to reach menu item
C 0. .
- Press the star button.
- Switch off the machine, wait a few seconds and switch it back on.
- Test the sale.
Vencube einstellen via Ventoolwin
| Programmbereich
|
Funktion
|
|
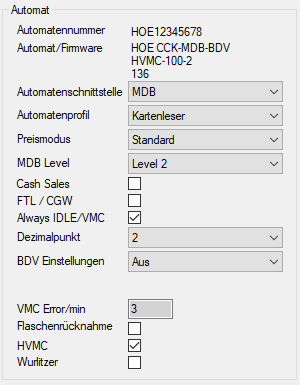
- HVMC
- Im Feld HVMC einen Haken setzen!
- Diese Einstellung ist für die korrekte Funktion der Meldung "Kein Wechselgeld" in Verbindung mit einer HVMC 100 Steuerung. Diese Funktion nur mit einer HVMC Steuerung benutzen!
- Das EVA Feld CCRBLC wird auf 1 gesetzt:
MA5*CCRBLC*1
|
|
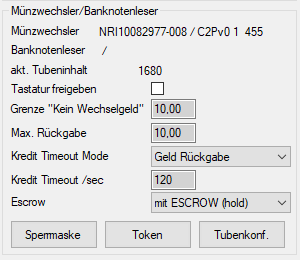
- Grenze "Kein Wechselgeld" bzw. Meldung "Kein Wechselgeld"
- Im Menü
C 8.8der Steuerung und im Vencube den Wert identisch einstellen.
|


