Operating the Vencube with a Höfer HVMC-100 Controller
Requirements
For MDB operation of the Vencube with an HVMC controller, the use of an EPROM with the software version:
HVMC 100-CC Version 1.38EUR (2Mbit)
is mandatory! EPROMs larger than 1Mbit cannot be used in the first series of HVMC controllers; for this reason, only a BDV Vencube can be used. All subsequent HVMC controllers are equipped for MDB operation with a Vencube after a software update. These controllers can be distinguished by the printed labels.
HVMC 100
HVMC 100-1/-2/-3
- Software version
HVMC 100 Version 1.38 EUR must be used.
- Convert the controller to MDB operation: →Set DIP switch 2 to OPEN.
- Set
C8.A with Display Card Amount in the menu.
After replacing the EPROM, the controller must be initialized and reconfigured. All previous data will be lost.
Connecting the Vencube with the MDB Interface
Preparation
- Disconnect the vending machine control system from the power supply (press the main switch or disconnect ST7).
- Check the EPROM version:
HVMC 100-CC Version 1.00 must be replaced with
HVMC 100-CC Version 1.38!
Note the installation direction; the notch on the EPROM and IC socket is important, not the EPROM sticker.
- Insert the Vencube into the MDB interface of the control system.
- Connect MDB payment systems to the Vencube via MDB.
- Turn on the vending machine.
Initialize the controller
- The following display should now appear:
EPROM swap -> Initialize!
- Set DIP switches 1 and 5 to the edge of the board and 2-4 to OPEN (controller initialization)!
- Press the star button
- The following will appear on the LCD:
Clear ??
- Now press selection button 5 on the machine.
- Now set all DIP switches to OPEN again.
- Wait until the display shows
Help! F6.
- Either continue with the section "Switching to a two-line display" or continue with the section "Switching to MDB mode".
Switching to a two-line display
| Function of the selection keys in the service menu
|
| Select 1
|
Back from the submenu
|

|
| Select 2
|
Step forward (larger) in the menu
|

|
| Select 3
|
Step back (smaller) in the menu
|

|
| Select 4
|
Call (enter) the selected menu item
|

|
| Select 5
|
Special functions (delete)
|
Clear
|
- If a two-line display is installed, the display setting must be changed to 2 lines with 16 characters.
Important: With a single-line LCD display, this step can be skipped!
- Press the star button for more than 5 seconds:
Clr ERR! appears (continue to hold)
and wait for the ServMenu display and release.
Following: C 0. .
- Press selection button 2: You will be asked for a password!
PW ????
The password is 4231, press the respective selection buttons and after entering it, the following appears: C 1. .
- Press selection button 4 and press selection button 2 several times to go to the menu item
C 1.C..
- Use selection key 4 to call up the setting
1Zl.8St.
and use selection key 2 to set it to two lines. 2Zl.16St
- Use selection key 1 to go back until
C 0. . appears on the display.
- Press the star key
- Wait until
Help! F6 appears on the display.
Switch to MDB operation
- Activate the MDB credit system: Set DIP switches 1 and 3-5 to OPEN and DIP switch 2 to the board edge.
- If necessary, activate the blank lamp control for GP: Set DIP switch 4 to the board edge as well.
- Press the star button
After the controller has booted up, one of the two displays should appear.
Either: No change! or: Hello
Setting the machine
| Function of the selection buttons in the service menu
|
| Select 1
|
Back from the submenu
|
|
| Select 2
|
Step forward (larger) in the menu
|
|
| Select 3
|
Step back (smaller) in the menu
|
|
| Select 4
|
Call (enter) the selected menu item
|
|
| Select 5
|
Special functions (Delete)
|
Clear
|
- Press the star button for more than 5 seconds:
Clr ERR! appears (continue to hold)
and wait for the ServMenu display and release.
Following: C 0. .
- Press selection button 2: You will be asked for a password!
PW ????
Password is 4231, press the corresponding selection keys and after entering the following appears: C 1. .
- Now configure the machine in the following menu items:
C1.3 Set the date and timeC1.6 Specify the number of slotsC1.1 Assign the selection keys to the outputsC6 Price setting- Important!:
C8 Set the credit system setting in menu item C8.A to "display with card amount"!
- Use key 1 to menu item
C 0. .
- Press the star button.
- Turn off the machine, wait a few seconds, and turn it back on.
- Test the sale.
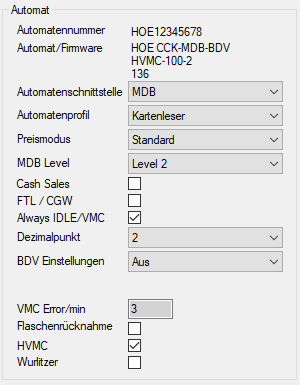
Setting up Vencube via Ventoolwin
| Program area
|
Function
|
|
- HVMC
- Check the HVMC field!
- This setting is for the correct function of the "No Change" message in conjunction with an HVMC 100 controller. Use this function only with an HVMC controller!
- The EVA field CCRBLC is set to 1:
MA5*CCRBLC*1
|
| Datei:VTW Münzwechsler Banknoteleser 1.png
|
"No Change" limit or "No Change" message
- Set the value identically in the
C 8.8 menu of the controller and in the Vencube.
|
