Vorlagen für Einbauhinweise
Vorlage:Einbauhinweise Vencube alpha
Vorlage:Einbauhinweise Vencube alpha
Vorlage:Einbauhinweise Vencube beta
Vorlage:Einbauhinweise Vencube beta
Vorlagen für CPI/MEI
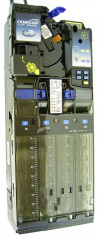
mei CF 690 VenCube erzeugt tickende Geräusche
Vorlage:Mei CF 690 VenCube erzeugt tickende Geräusche
| image
|
root cause
|
rectification
|
|
MDB level from coin changer is not level 3
|
The coin changer must be converted to MDB Level 3 with all extras:
- Hold the "Yellow button" on the coin validator for two seconds until
Prices appears on the display.
- Use the "B button" (press once) to go to
Settings and confirm with the "A button" .
- Now the display shows
MDB Config.: Active and by pressing the '"A-key" again MDB Version is called up.
- The display continues to scroll and pressing the "A button" again shows (level).
There are three settings:
Change with the 'B-key'!
- Level 2
- Level 3 No Extras
- Level 3 All extras.
- Select the setting MDB Level 3 All Extras and confirm with the '"A-Key".
- Exit the settings menu by pressing the "yellow button".
- If the VenCube is still ticking, the vending machine must be switched off once.
Please wait a few seconds before switching it on again.
Attention:
There are 2x MDB Level 3, please note the running text in the display.
|
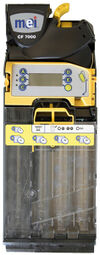
mei CF 7400 VenCube erzeugt tickende Geräusche
Vorlage:Mei CF 7400 VenCube erzeugt tickende Geräusche
| image
|
root cause
|
rectification
|

|
MDB level from coin changer is not level 3
|
The CF7400 cannot be switched in the field. In this case, the coinchanger must be replaced.
|
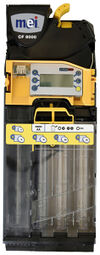
mei CF 7900 VenCube erzeugt tickende Geräusche
Vorlage:Mei CF 7900 VenCube erzeugt tickende Geräusche
| image
|
root cause
|
rectification
|
|
MDB level from coin changer is not level 3
|
- Setting
- Press and hold the yellow button on the coin validator for 3 seconds until
Prices is shown on the display.
- Press the D button 3x until
Automation Options appears on the display.
- Press yellow button 1x for
MDB Options and press yellow button again for Change. optimal..
- Press the D button once for
Level and confirm with the yellow button.
- Then press the D button until
Level 3 is displayed and confirm with yellow.
- Now press the C button until you exit the menu.
Then restart the vending machine. Please wait a few seconds before turning it back on.
|
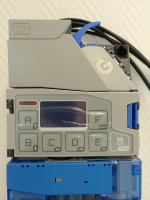
mei CF 8000 VenCube erzeugt tickende Geräusche
Vorlage:Mei CF 8000 VenCube erzeugt tickende Geräusche
| image
|
root cause
|
rectification
|
|
MDB level from coin changer is not level 3
|
- The level 3 setting applies to all four variants of the 8000 series.
- CF 8200
- CF 8250
- CF 8500
- CF 8550
- Setting
- Press and hold the yellow button on the coin validator for 3 seconds until
Prices is shown on the display.
- Press the D button 3x until
Automation Options appears on the display.
- Press yellow button 1x for
MDB Options and press yellow button again for Change. optimal..
- Press the D button once until
Level is displayed.
- Select
Level menu with yellow and select Level 3 using the D or E button and confirm with yellow.
- Then press the C button until you exit the menu.
Then restart the vending machine. Please wait a few seconds before turning it back on.
|
Vorlagen NRI
Vorlagen Currenza C2
Vorlage:Currenza C2 VenCube erzeugt tickende Geräusche
| Image
|
Root cause
|
Rectification
|
|
MDB level from coin changer is not level 3
|
- Press menu key.
- Select button E for settings.
- Step down with the B button to -Other settings and confirm again with E (OK).
- Press button B until -MDB-Level- is displayed. Confirm again with E.
- Now you can change the level with the A and B keys.
- Level 3 must be set.
- Confirm with E (OK) and exit the menu with the Menu button (press twice).
The vending machine must be switched off and on again once. Please wait a few seconds before turning it back on.
If the device does not have a display with buttons, the change can be made with the HENRI module.
|
Vorlagen SuzoHapp
Vorlagen für Sielaff
Hinweis erhöter Datenaustausch
Vorlage:Hinweis erhöter Datenaustausch

|
After the VMC is switched on for the first time with the Vencube connected, there is increased data exchange between the controller and the Vencube. As a result, the VMC cannot be operated for up to ten minutes, or only very slowly, and coin acceptance and payout can be disrupted at the same time. After the waiting time, the machine will work again without any problems.
|
Hinweise MDB Sielaff
Vorlage:Hinweis MDB Sielaff
|
|
Note:
These VMC all have MDB interfaces, the Vencube should therefore also be operated directly via MDB without adapter boards or cable harnesses and not via BDV master cable. Depending on which cashless payment system is connected to the Vencube, a BDV or MDB slave cable is to be used here. For coin changers and bill readers, always MDB is preferable.
|
Hinweise Software Sielaff
Vorlage:Hinweis Software Sielaff
|
|
Note:
Depending on the type of VMC and the software version of the VMC, not all setting options may be available, and the points that are not available can then be skipped. It may also be possible that the setting items have a German or English name, or that the texts are displayed somewhat differently.
|
Hinweise Patchmenü Sielaff
Vorlage:Hinweis Patchmenü Sielaff
Make the following settings in the patch menu and check them in the installation menu and make additional settings there if necessary.
The patch menu is reached via the service menu (M-8-E) by entering 99M 55M.
Settings in the patch menu
M - 8 - E 99M 55M
|
| setting
|
option
|
| ALT.PAYOUT
|
enabled
|
| TUBECOUNT
|
Coin Mech contr.
|
| MIXED PAYMENT
|
allowed
|
| MDB-comp.mode
|
B.Pract.
|
| SAVE SETTINGS
|
yes
After pressing the "E" key
"done" stands for confirmation
in the display!
|
|
|
Settings in the installation menu
M - 7 - E
|
| setting
|
option
|
| CRED. CONFIG.
|
MAN.CONFIG.
|
| TUBE COUNT
|
by COINMECH
|
| ALT.PAYOUT
|
on
|
| MIXED PAYM.
|
on
|
| MIXED PAYM.PRICE
|
cash price
|
| MDB-comp.mode
|
b. practice
|
|
Hinweis Patchmenü Sielaff SÜ
Vorlage:Hinweis Patchmenü Sielaff SÜ
Make the following settings in the patch menu and check them in the installation menu and make additional settings there if necessary.
The patch menu is reached via the service menu (M-8-E) by entering 99M 55M.
Settings in the patch menu
M - 8 - E 99M 55M
|
| Settings
|
Options
|
| ALT.PAYOUT
|
enabled
|
| TUBECOUNT
|
COIN MECH contr.
|
| MIXED PAYMENT
|
allowed
|
| MDB-comp.mode
|
B.Pract.
|
| SAVE SETTINGS
|
yes
After pressing the "E" key
"done" stands for confirmation
in the display!
|
|
|
Settings in the installation menu
M - 7 - E
|
| Settings
|
Options
|
| > CREDIT SYSTEM
|
CRED. CONFIG.
|
MAN.CONFIG.
|
| > COIN MECHANISM
|
TUBE COUNT
|
by COINMECH
|
| ALT. PAYOUT
|
on
|
| TUBES EMPTY INFO
|
A
|
| > CARD READER
|
MIXED PAYM.
|
on
|
| MIXED PAYM.PRICE
|
cash price
|
| MDB-comp.mode
|
Best Practice
|
| MDB ITEM NUMBERS
|
Hexadezimal
|
|
|
|
Note:
The previously made settings must be checked again after a software update of the VMC.
|
Vorlagen für Vendo
Hinweis Vendo Cashless Preise Einstellen
Vorlage:Hinweis Vendo Cashless Preise Einstellen
Vorlage:Hinweis Vendo Cashless Preise Einstellen
Vorlagen für Türschalter
Hinweis vorhandener Türschalter
Vorlage:Hinweis vorhandener Türschalter

|
Never use the existing door switch of the machine, this can destroy the Vencube.
|
Hinweis Türschalter als Schließer
Vorlage:Hinweis Türschalter als Schließer
|
|
Always connect the door switch as closer to plug 1 with the Vencube.
Use connector "COM" and connector "NO" from the switch.
|


